'분류 전체보기'에 해당되는 글 539건

  1. 2003.07.29 Extract Interface
  2. 2003.07.29 Extract Class
  3. 2003.07.29 Encapsulate Field
  4. 2003.07.29 Encapsulate Downcast
  5. 2003.07.29 Encapsulate Collection
  6. 2003.07.29 Eliminate Inter-Entity Bean Communication (Link only)
  7. 2003.07.29 Decompose Conditional
  8. 2003.07.29 Convert Static to Dynamic Construction (by Gerard M. Davison) <IMG SRC = "http://www.refactoring.com/catalog/new.gif" border=0>
  9. 2003.07.29 Convert Dynamic to Static Construction (by Gerard M. Davison) <IMG SRC = "http://www.refactoring.com/catalog/new.gif" border=0>
  10. 2003.07.29 Consolidate Duplicate Conditional Fragments <IMG SRC = "http://www.refactoring.com/catalog/updated.gif" border=0>
  11. 2003.07.29 Consolidate Conditional Expression
  12. 2003.07.29 Collapse Hierarchy
  13. 2003.07.29 Change Value to Reference
  14. 2003.07.29 Change Unidirectional Association to Bidirectional <IMG SRC = "http://www.refactoring.com/catalog/updated.gif" border=0>
  15. 2003.07.29 Change Reference to Value
  16. 2003.07.29 Change Bidirectional Association to Unidirectional
  17. 2003.07.29 Add Parameter
  18. 2003.07.24 Top Ten Tomcat Configuration Tips
  19. 2003.06.26 기술표준원-TTA 공조
  20. 2003.06.25 INDECS와 DOI관계..
  21. 2003.06.25 식별자 ... 2
  22. 2003.06.24 국내 음악 기술 주도 단체
  23. 2003.06.24 SDMI(Secure Digital Music Initiative)
  24. 2003.06.24 MARC(Machine Readable Cataloging)
  25. 2003.06.24 INDECS
  26. 2003.06.24 DOI
  27. 2003.06.24 [DRM] DRM 기술 및 표준화
  28. 2003.06.24 DMCA
  29. 2003.06.24 [DRM] 디지털 워터마킹(watermarking) 과의 차이점
  30. 2003.06.24 Semantic Web의 표준화 및 요소기술 개발 동향

Extract Interface


Several clients use the same subset of a class's interface, or two classes have part of their interfaces in common.

Extract the subset into an interface.


For more information see page 341 of Refactoring


***** 아름다운프로님에 의해서 게시물 복사 + 카테고리변경되었습니다 (2003-12-18 17:27)
Posted by 아름프로

Extract Class


You have one class doing work that should be done by two.

Create a new class and move the relevant fields and methods from the old class into the new class.


For more information see page 149 of Refactoring


***** 아름다운프로님에 의해서 게시물 복사 + 카테고리변경되었습니다 (2003-12-18 17:27)
Posted by 아름프로

Encapsulate Field


There is a public field.

Make it private and provide accessors.

public String _name


private String _name;
public String getName() {return _name;}
public void setName(String arg) {_name = arg;}

For more information see page 206 of Refactoring


***** 아름다운프로님에 의해서 게시물 복사 + 카테고리변경되었습니다 (2003-12-18 17:27)
Posted by 아름프로

Encapsulate Downcast


A method returns an object that needs to be downcasted by its callers.

Move the downcast to within the method.

Object lastReading() {
        return readings.lastElement();
}


Reading lastReading() {
        return (Reading) readings.lastElement();
}

For more information see page 308 of Refactoring


***** 아름다운프로님에 의해서 게시물 복사 + 카테고리변경되었습니다 (2003-12-18 17:27)
Posted by 아름프로

Encapsulate Collection


A method returns a collection.

Make it return a read-only view and provide add/remove methods.


For more information see page 208 of Refactoring


***** 아름다운프로님에 의해서 게시물 복사 + 카테고리변경되었습니다 (2003-12-18 17:27)
Posted by 아름프로

Eliminate Inter-Entity Bean Communication


Inter-entity bean relationships introduce overhead in the model

Reduce or eliminate the inter-entity bean relationships by using coarse-grained entity bean (Composite Entity) with dependent objects

For further information see page 110 of Core J2EE Patterns by Alur, Crupi, and Malks


***** 아름다운프로님에 의해서 게시물 복사 + 카테고리변경되었습니다 (2003-12-18 17:27)
Posted by 아름프로

Decompose Conditional


You have a complicated conditional (if-then-else) statement.

Extract methods from the condition, then part, and else parts.

                if (date.before (SUMMER_START) || date.after(SUMMER_END))
                        charge = quantity * _winterRate + _winterServiceCharge;
                else charge = quantity * _summerRate;


                if (notSummer(date))
                        charge = winterCharge(quantity);
                else charge = summerCharge (quantity);

For more information see page 238 of Refactoring


***** 아름다운프로님에 의해서 게시물 복사 + 카테고리변경되었습니다 (2003-12-18 17:27)
Posted by 아름프로

Convert Static to Dynamic Construction


Refactoring contributed by Gerard M. Davison


You have classes that have static compile time dependencies on classes that can only be built on a specific platform.


Make use of the java.lang.reflect to break the static dependency.


   import org.davison.data.jdbc.JDBCProvider;

   .
   .
   .


   DataProvider dp = new JDBCProvider();


   try
   {
      DataProvider dp = (DataProvider)
         Class.forName("org.davison.data.jdbc.JDBCProvider").newInstance();
   }
   catch (IllegalAccessException iae)
   {
      // Convert exception to error to preseve the interface.
      //
      
      throw new IllegalAccessError(iae.getMessage());
   }
   catch (InstantiationException ie)
   {
      // Convert exception to error to preseve the interface.
      //
      
      throw new InstantiationError(ie.getMessage());      
   }
   catch (ClassNotFoundException cnfe)
   {
      // Convert exception to error to preseve the interface.
      //

      throw new NoClassDefFoundError(cnfe.getMessage());
   }


Motivation


In some cases you have to provide drivers to provide different functionality depending on the situation. You might have classes that on a given platform need to access some sun.* classes to perform a specific function. For example a class to access WinHelp needs to get the window handle via the sun.awt.windows.WWindowPeer classes.

There might also be the desire to only provide certian functionality to a given sub-set of users. This is the equivalent of being able to compile out code without having to alter the source or use pre-compilers.

This method can be used with good effect with application frameworks where you do not know which class need to be used at compile time.

Mechanics


- Identify the place where the different classes are instantiated. If there is more than one place, you might like to make use of code consolidation refactorings to create one entry point.
- Make sure that there is a common interface and method of construction. Utilise Extract Interface or use Extract Superclass to create a suitable abstraction to work with.
- Replace the class selection process with one that instead selects for the string name of the class in question.
Remove any import statements that refere the the classes being constructed.
- Add code in to load and instantiate the class. For more parameterised contructors, make use of the java.lang.reflect package.
- Deal with any excpetion generated.
- You are now ready to compile and test the code. Make sure that any dependant code is also tested properly.
- The refactoring is complete, but you should make sure that this run-time dependency is properly documented and that all developers know to instantiate the classes using the new or altered method.

Example


Start with this code:


   import org.davison.data.jdbc.JDBCProvider;

   .
   .
   .

   DataProvider dp = new JDBCProvider();


First we have to change the selection code to return a class name rather than an actual instance. We can safely remove the import statement that referes to this class.


   Class.forName("org.davison.data.jdbc.JDBCProvider")


We can now instantiate the class, in this simple case the constructor has no parameters, so we do not have to make use of the extended java.lang.reflect package.


      DataProvider dp = (DataProvider)
         Class.forName("org.davison.data.jdbc.JDBCProvider").newInstance();


We no have to add the code to deal with the possible exception cases. Here I have chosen to convert them to the equivalent Java Errors in order to maintain the interface. If this is not required then simpler code is possible.


   try
   {
      DataProvider dp = (DataProvider)
         Class.forName("org.davison.data.jdbc.JDBCProvider").newInstance();
   }
   catch (IllegalAccessException iae)
   {
      // Convert exception to error to preseve the interface.
      //
      
      throw new IllegalAccessError(iae.getMessage());
   }
   catch (InstantiationException ie)
   {
      // Convert exception to error to preseve the interface.
      //
      
      throw new InstantiationError(ie.getMessage());      
   }
   catch (ClassNotFoundException cnfe)
   {
      // Convert exception to error to preseve the interface.
      //

      throw new NoClassDefFoundError(cnfe.getMessage());
   }


Compile and test at this point as we have code that is complete.

When this is finished and all dependent classes are re-tested, the refactoring is complete.


***** 아름다운프로님에 의해서 게시물 복사 + 카테고리변경되었습니다 (2003-12-18 17:27)
Posted by 아름프로

Convert Dynamic to Static Construction


Refactoring contributed by Gerard M. Davison


You have code that loads other classes dynamically. This can introduce a un-waranted overhead and can produce code that is more fragile.


Replace the dynamic class loading with static code.


   try
   {
      DataProvider dp = (DataProvider)
         Class.forName("org.davison.data.jdbc.JDBCProvider").newInstance();
   }
   catch (IllegalAccessException iae)
   {
      // Convert exception to error to preseve the interface.
      //
      
      throw new IllegalAccessError(iae.getMessage());
   }
   catch (InstantiationException ie)
   {
      // Convert exception to error to preseve the interface.
      //
      
      throw new InstantiationError(ie.getMessage());      
   }
   catch (ClassNotFoundException cnfe)
   {
      // Convert exception to error to preseve the interface.
      //

      throw new NoClassDefFoundError(cnfe.getMessage());
   }


   import org.davison.data.jdbc.JDBCProvider;

   .
   .
   .
  
   DataProvider dp = new JDBCProvider();


Motivation


In some cases code is written with dynamic dependencies between parts of the code by utilising Java ability to load and instantiate arbitrary classes. If not properly managed, this can cause run-time errors. This design can impart a performance penalty because of the extra levels of indirection. It can also prevent the compiler from detecting certian types of error.

Mechanics


- Identify the places where the different classes are instantiated. If there is more than one place, you might like to make use of code consolidation refactorings to create one entry point.
- You can remove the code that instantiates the classes using java.lang.reflect. We will instead call the constructors directly.
Replace the code that selects the name of the class with simpler code that simply returns a new instance.
- Add in import statements as required for the classes being constructed.
- You are now ready to compile and test the code. Make sure that any dependant code is also tested properly.
- The refactoring is complete.

Example


Start with this code:

   try
   {
      DataProvider dp = (DataProvider)
         Class.forName("org.davison.data.jdbc.JDBCProvider").newInstance();
   }
   catch (IllegalAccessException iae)
   {
      // Convert exception to error to preseve the interface.
      //
      
      throw new IllegalAccessError(iae.getMessage());
   }
   catch (InstantiationException ie)
   {
      // Convert exception to error to preseve the interface.
      //
      
      throw new InstantiationError(ie.getMessage());      
   }
   catch (ClassNotFoundException cnfe)
   {
      // Convert exception to error to preseve the interface.
      //

      throw new NoClassDefFoundError(cnfe.getMessage());
   }


We can remove the error handling code and simply instantiate the class.


   DataProvider dp = new JDBCProvider();


The final step is to add in the correct import statement


   import org.davison.data.jdbc.JDBCProvider;

   .
   .
   .
  
   DataProvider dp = new JDBCProvider();


Compile and test at this point as we have code that is complete.

When this is finished and all dependent classes are re-tested, the refactoring is complete.

Another way of creating compile time dependencies is to use class literals. This would still have the overhead of dynamic instantiation. I would not recommend this unless you have good reason; but here is the code converted to use this method.


   try
   {
      DataProvider dp = (DataProvider)
         org.davison.data.jdbc.JDBCProvider.class.newInstance();
   }
   catch (IllegalAccessException iae)
   {
      // Convert exception to error to preseve the interface.
      //
      
      throw new IllegalAccessError(iae.getMessage());
   }
   catch (InstantiationException ie)
   {
      // Convert exception to error to preseve the interface.
      //
      
      throw new InstantiationError(ie.getMessage());      
   }
   catch (ClassNotFoundException cnfe)
   {
      // Convert exception to error to preseve the interface.
      //

      throw new NoClassDefFoundError(cnfe.getMessage());
   }


***** 아름다운프로님에 의해서 게시물 복사 + 카테고리변경되었습니다 (2003-12-18 17:27)
Posted by 아름프로

Consolidate Duplicate Conditional Fragments


The same fragment of code is in all branches of a conditional expression.

Move it outside of the expression.

                if (isSpecialDeal()) {
                        total = price * 0.95;
                        send();
                }
                else {
                        total = price * 0.98;
                        send();
                }


                if (isSpecialDeal())
                        total = price * 0.95;
                else
                        total = price * 0.98;
                send();

For more information see page 243 of Refactoring

Additional Comments


Using with try/catch blocks

Paul Haahr rightly took me to task for being far too glib when I talked about consolidating with exceptions. You can only pull repeated code into a final block if all non-fatal exceptions are caught. This is because the finally block is executed after any exception, including those that don't have a catch clause. (Of course you may prefer that to happen, but that's not a semantics preserving change.)

Contributors


- Paul Haahr


***** 아름다운프로님에 의해서 게시물 복사 + 카테고리변경되었습니다 (2003-12-18 17:27)
Posted by 아름프로

Consolidate Conditional Expression


You have a sequence of conditional tests with the same result.

Combine them into a single conditional expression and extract it.

        double disabilityAmount() {
                if (_seniority < 2) return 0;
                if (_monthsDisabled > 12) return 0;
                if (_isPartTime) return 0;
                // compute the disability amount


        double disabilityAmount() {
                if (isNotEligableForDisability()) return 0;
                // compute the disability amount

For more information see page 240 of Refactoring


***** 아름다운프로님에 의해서 게시물 복사 + 카테고리변경되었습니다 (2003-12-18 17:27)
Posted by 아름프로

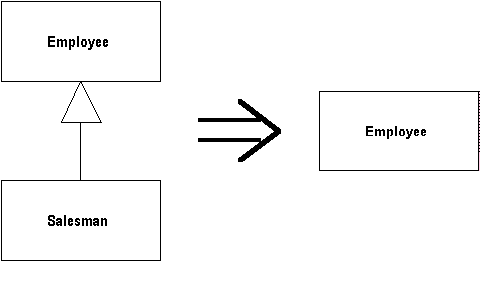
Collapse Hierarchy


A superclass and subclass are not very different.

Merge them together.


For more information see page 344 of Refactoring


***** 아름다운프로님에 의해서 게시물 복사 + 카테고리변경되었습니다 (2003-12-18 17:27)
Posted by 아름프로

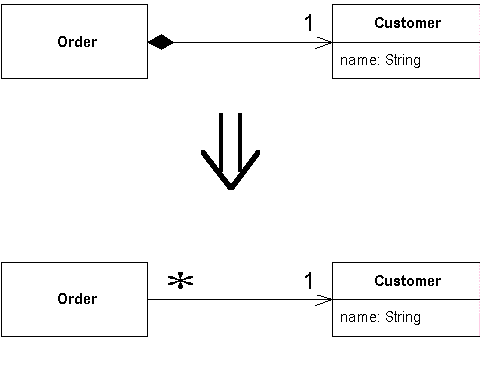
Change Value to Reference


You have a class with many equal instances that you want to replace with a single object.


Turn the object into a reference object.


For more information see page 179 of Refactoring


***** 아름다운프로님에 의해서 게시물 복사 + 카테고리변경되었습니다 (2003-12-18 17:27)
Posted by 아름프로

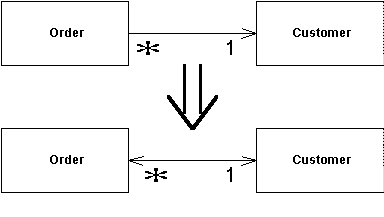
Change Unidirectional Association to Bidirectional


You have two classes that need to use each other's features, but there is only a one-way link.

Add back pointers, and change modifiers to update both sets.


For more information see page 197 of Refactoring

Additional Comments


Doing a remove

In the example I showed an addOrder method, but I didn't show the removeOrder method. If you want to do a remove, you would write it like the add method but set the customer to null.

Class Customer ...
void removeOrder( Order arg ) {
  arg.setCustomer( null );
}

Contributors


- Andy Bulka
- Don Roberts


***** 아름다운프로님에 의해서 게시물 복사 + 카테고리변경되었습니다 (2003-12-18 17:27)
Posted by 아름프로

Change Reference to Value


You have a reference object that is small, immutable, and awkward to manage.

Turn it into a value object.


For more information see page 183 of Refactoring


***** 아름다운프로님에 의해서 게시물 복사 + 카테고리변경되었습니다 (2003-12-18 17:27)
Posted by 아름프로

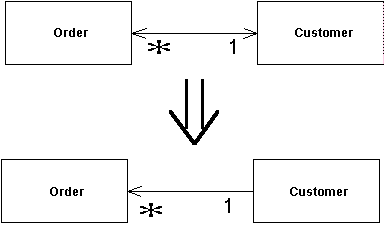
Change Bidirectional Association to Unidirectional


You have a two-way association but one class no longer needs features from the other.

Drop the unneeded end of the association.


For more information see page 200 of Refactoring


***** 아름다운프로님에 의해서 게시물 복사 + 카테고리변경되었습니다 (2003-12-18 17:27)
Posted by 아름프로

Add Parameter


A method needs more information from its caller.

Add a parameter for an object that can pass on this information.


For more information see page 275 of Refactoring


***** 아름다운프로님에 의해서 게시물 복사 + 카테고리변경되었습니다 (2003-12-18 17:27)
Posted by 아름프로
Coauthor's note: Now that writing Java web applications has become a common way to create and deploy new web content, people around the globe are finding the Jakarta Tomcat servlet and JSP container useful. It's free, it's multiplatform, it's rich in features, it's rapidly evolving and improving, and it's never been more popular.

The only catch seems to be this: how can you configure Tomcat to do what you want it to do? Tomcat is capable, as long as you can configure it to suit your needs. Below is my list of ten Tomcat configuration tips, taken from Tomcat: The Definitive Guide, to help you do just that. -- Jason Brittain

1. Configuring the Admin Web Application
Most commercial J2EE servers provide a fully functional administrative interface, and many of these are accessible as web applications. The Tomcat Admin application is on its way to becoming a full-blown Tomcat administration tool rivaling these commercial offerings. First included in Tomcat 4.1, Admin already provides control over contexts, data sources, and users and groups. You can also control resources such as initialization parameters, as well as users, groups, and roles in a variety of user databases. The list of capabilities will be expanded upon in future releases, but the present implementation has proven itself to be quite useful.

Related Reading


Tomcat: The Definitive Guide
By Jason Brittain, Ian F. Darwin

Table of Contents
Index
Sample Chapter

Read Online--Safari Search this book on Safari:
    
Only This Book All of Safari
Code Fragments only  
The Admin web application is defined in the auto-deployment file CATALINA_BASE/webapps/admin.xml.

You must edit this file to ensure that the path specified in the docBase attribute of the Context element is absolute; that is, the absolute path of CATALINA_HOME/server/webapps/admin. Alternatively, you could just remove the auto-deployment file and specify the Admin context manually in your server.xml file. On machines that will not be managed by this application, you should probably disable it altogether by simply removing CATALINA_BASE/webapps/admin.xml.

If you're using a UserDatabaseRealm (the default), you'll need to add a user and a role to the CATALINA_BASE/conf/tomcat-users.xml file. For now, just edit this file, and add a role named "admin" to your users database:

<role name="admin"/>
You must also have a user who is assigned to the "admin" role. Add a user line like this after the existing user entries (changing the password to something a bit more secure):

<user name="admin" password="deep_dark_secret" roles="admin"/>
Once you've performed these steps and restarted Tomcat, visit the URL http://localhost:8080/admin, and you should see a login screen. The Admin application is built using container-managed security and the Jakarta Struts framework. Once you have logged in as a user assigned to the admin role, you will be able to use the Admin application to configure Tomcat.

2. Configuring the Manager Web Application
The Manager web application lets you perform simple management tasks on your web applications through a more simplified web user interface than that of the Admin web app.

The Manager web application is defined in the auto-deployment file CATALINA_BASE/webapps/manager.xml.

You must edit this file to ensure that the path specified in the docBase attribute of the Context element is absolute; that is, the absolute path of CATALINA_HOME/server/webapps/manager.

If you're using the default UserDatabaseRealm, you'll need to add a user and role to the CATALINA_BASE/conf/tomcat-users.xml file. For now, just edit this file, and add a role named "manager" to your users database:

<role name="manager"/>
You must also have a user who is assigned the "manager" role. Add a user line like this after the existing user entries (changing the password to something a bit more secure):

<user name="manager" password="deep_dark_secret" roles="manager"/>
Then restart Tomcat and visit the URL http://localhost/manager/list to see the plain-text manager interface, or http://localhost/manager/html/list for the simple HTML manager interface. Either way, your Manager application should now be working.

The Manager application lets you install new web applications on a non-persistent basis, for testing. If we have a web application in /home/user/hello and want to test it by installing it under the URI /hello, we put "/hello" in the first text input field (for Path) and "file:/home/user/hello" in the second text input field (for Config URL).

The Manager also allows you to stop, reload, remove, or undeploy a web application. Stopping an application makes it unavailable until further notice, but of course it can then be restarted. Users attempting to access a stopped application will receive an error message, such as 503 - This application is not currently available.

Removing a web application removes it only from the running copy of Tomcat -- if it was started from the configuration files, it will reappear the next time you restart Tomcat (i.e., removal does not remove the web application's content from disk).

3. Deploying a Web Application
There are two ways of deploying a web application on the filesystem:

1. Copy your WAR file or your web application's directory (including all of its content) to the $CATALINA_BASE/webapps directory.

2. Create an XML fragment file with just the Context element for your web application, and place this XML file in $CATALINA_BASE/webapps. The web application itself can then be stored anywhere on your filesystem.

If you have a WAR file, you can deploy it by simply copying the WAR file into the directory CATALINA_BASE/webapps. The filename must end with an extension of ".war". Once Tomcat notices the file, it will (by default) unpack it into a subdirectory with the base name of the WAR file. It will then create a context in memory, just as though you had created one by editing Tomcat's server.xml file. However, any necessary defaults will be obtained from the DefaultContext element in Tomcat's server.xml file.

Another way to deploy a web app is by writing a Context XML fragment file and deploying it into the CATALINA_BASE/webapps directory. A context fragment is not a complete XML document, but just one Context element and any subelements that are appropriate for your web application. These files are like Context elements cut out of the server.xml file, hence the name "context fragment."

For example, if we wanted to deploy the WAR file MyWebApp.war along with a realm for accessing parts of that web application, we could use this fragment:


<!--  
  Context fragment for deploying MyWebApp.war  
-->
<Context path="/demo" docBase="webapps/MyWebApp.war"
         debug="0" privileged="true">
  <Realm className="org.apache.catalina.realm.UserDatabaseRealm"                
         resourceName="UserDatabase"/>
</Context>

Put that in a file called "MyWebApp.xml," and copy it into your CATALINA_BASE/webapps directory.

These context fragments provide a convenient method of deploying web applications; you do not need to edit the server.xml file and, unless you have turned off the default liveDeploy feature, you don't have to restart Tomcat to install a new web application.

4. Configuring Virtual Hosts
The Host element normally needs modification only when you are setting up virtual hosts. Virtual hosting is a mechanism whereby one web server process can serve multiple domain names, giving each domain the appearance of having its own server. In fact, the majority of small business web sites are implemented as virtual hosts, due to the expense of connecting a computer directly to the Internet with sufficient bandwidth to provide reasonable response times and the stability of a permanent IP address.

Name-based virtual hosting is created on any web server by establishing an aliased IP address in the Domain Name Service (DNS) data and telling the web server to map all requests destined for the aliased address to a particular directory of web pages. Since this article is about Tomcat, we don't try to show all of the ways to set up DNS data on various operating systems. If you need help with this, please refer to DNS and Bind, by Paul Albitz and Cricket Liu (O'Reilly). For demonstration purposes, I'll use a static hosts file, since that's the easiest way to set up aliases for testing purposes.

To use virtual hosts in Tomcat, you just need to set up the DNS or hosts data for the host. For testing, making an IP alias for localhost is sufficient. You then need to add a few lines to the server.xml configuration file:


<Server port="8005" shutdown="SHUTDOWN" debug="0">
  <Service name="Tomcat-Standalone">
    <Connector className="org.apache.coyote.tomcat4.CoyoteConnector"
                        port="8080" minProcessors="5" maxProcessors="75"
                        enableLookups="true" redirectPort="8443"/>
    <Connector className="org.apache.coyote.tomcat4.CoyoteConnector"
                        port="8443" minProcessors="5" maxProcessors="75"
                        acceptCount="10" debug="0" scheme="https" secure="true"/>
      <Factory className="org.apache.coyote.tomcat4.CoyoteServerSocketFactory"
                        clientAuth="false" protocol="TLS" />
    </Connector>
    <Engine name="Standalone" defaultHost="localhost" debug="0">
      <!-- This Host is the default Host -->
      <Host name="localhost" debug="0" appBase="webapps"
              unpackWARs="true" autoDeploy="true">
        <Context path="" docBase="ROOT" debug="0"/>
        <Context path="/orders" docBase="/home/ian/orders" debug="0"
                       reloadable="true" crossContext="true">
        </Context>
      </Host>

      <!-- This Host is the first "Virtual Host": www.example.com -->
      <Host name="www.example.com" appBase="/home/example/webapp">
        <Context path="" docBase="."/>
      </Host>

    </Engine>
  </Service>
</Server>
Tomcat's server.xml file, as distributed, contains only one virtual host, but it is easy to add support for additional virtual hosts. The simplified version of the server.xml file in the previous example shows in bold the overall additional structure needed to add one virtual host. Each Host element must have one or more Context elements within it; one of these must be the default Context for this host, which is specified by having its relative path set to the empty string (for example, path="").

5. Configuring Basic Authentication
Container-managed authentication methods control how a user's credentials are verified when a web app's protected resource is accessed. When a web application uses basic authentication (BASIC in the web.xml file's auth-method element), Tomcat uses HTTP basic authentication to ask the web browser for a username and password whenever the browser requests a resource of that protected web application. With this authentication method, all passwords are sent across the network in base64-encoded text.

Note: using basic authentication is generally considered insecure because it does not strongly encrypt passwords, unless the site also uses HTTPS or some other form of encryption between the client and the server (for instance, a virtual private network). Without this extra encryption, network monitors can intercept (and misuse) users' passwords. But, if you're just starting to use Tomcat, or if you just want to test container-managed security with your web app, basic authentication is easy to set up and test. Just add <security-constraint> and <login-config> elements to your web app's web.xml file, and add the appropriate <role> and <user> elements to your CATALINA_BASE/conf/tomcat-users.xml file, restart Tomcat, and Tomcat takes care of the rest.

The example below shows a web.xml excerpt from a club membership web site with a members-only subdirectory that is protected using basic authentication. Note that this effectively takes the place of the Apache web server's .htaccess files.


<!--
  Define the Members-only area, by defining
  a "Security Constraint" on this Application, and
  mapping it to the subdirectory (URL) that we want
  to restrict.
-->
<security-constraint>
  <web-resource-collection>
    <web-resource-name>
      Entire Application
    </web-resource-name>
    <url-pattern>/members/*</url-pattern>
  </web-resource-collection>
  <auth-constraint>
      <role-name>member</role-name>
  </auth-constraint>
</security-constraint>
<!-- Define the Login Configuration for this Application -->
<login-config>
  <auth-method>BASIC</auth-method>
  <realm-name>My Club Members-only Area</realm-name>
</login-config>


6. Configuring Single Sign-On
Once you've set up your realm and method of authentication, you'll need to deal with the actual process of logging the user in. More often than not, logging into an application is a nuisance to an end user, and you will need to minimize the number of times they must authenticate. By default, each web application will ask the user to log in the first time the user requests a protected resource. This can seem like a hassle to your users if you run multiple web applications and each application asks the user to authenticate. Users cannot tell how many separate applications make up any single web site, so they won't know when they're making a request that crosses a context boundary, and will wonder why they're being repeatedly asked to log in.

The "single sign-on" feature of Tomcat 4 allows a user to authenticate only once to access all of the web applications loaded under a virtual host. To use this feature, you need only add a SingleSignOn Valve element at the host level. This looks like the following:


<Valve className="org.apache.catalina.authenticator.SingleSignOn"
       debug="0"/>

The Tomcat distribution's default server.xml contains a commented-out single sign-on Valve configuration example that you can uncomment and use. Then, any user who is considered valid in a context within the configured virtual host will be considered valid in all other contexts for that same host.

There are several important restrictions for using the single sign-on valve:

The valve must be configured and nested within the same Host element that the web applications (represented by Context elements) are nested within.

The Realm that contains the shared user information must be configured either at the level of the same Host or in an outer nesting.

The Realm cannot be overridden at the Context level.

The web applications that use single sign-on must use one of Tomcat's built-in authenticators (in the <auth-method> element of web.xml), rather than a custom authenticator. The built-in methods are basic, digest, form, and client-cert authentication.

If you're using single sign-on and wish to integrate another third-party web application into your web site, and the new web application uses only its own authentication code that doesn't use container-managed security, you're basically stuck. Your users will have to log in once for all of the web applications that use single sign-on, and then once again if they make a request to the new third-party web application. Of course, if you get the source and you're a developer, you could fix it, but that's probably not so easy to do.

The single sign-on valve requires the use of HTTP cookies.

7. Configuring Customized User Directories
Some sites like to allow individual users to publish a directory of web pages on the server. For example, a university department might want to give each student a public area, or an ISP might make some web space available on one of its servers to customers that don't have a virtually hosted web server. In such cases, it is typical to use the tilde character (~) plus the user's name as the virtual path of that user's web site:

http://www.cs.myuniversity.edu/~username
http://members.mybigisp.com/~username
Tomcat gives you two ways to map this on a per-host basis, using a couple of special Listener elements. The Listener's className attribute should be org.apache.catalina.startup.UserConfig, with the userClass attribute specifying one of several mapping classes. If your system runs Unix, has a standard /etc/passwd file that is readable by the account running Tomcat, and that file specifies users' home directories, use the PasswdUserDatabase mapping class:

<Listener className="org.apache.catalina.startup.UserConfig"
directoryName="public_html"
userClass="org.apache.catalina.startup.PasswdUserDatabase"/>
Web files would need to be in directories such as /home/users/ian/public_html or /users/jbrittain/public_html. Of course, you can change public_html to be whatever subdirectory into which your users put their personal web pages.

In fact, the directories don't have to be inside of a user's home directory at all. If you don't have a password file but want to map from a user name to a subdirectory of a common parent directory such as /home, use the HomesUserDatabase class:

<Listener className="org.apache.catalina.startup.UserConfig"
directoryName="public_html" homeBase="/home"
userClass="org.apache.catalina.startup.HomesUserDatabase"/>
In this case, web files would be in directories such as /home/ian/public_html or /home/jasonb/public_html. This format is more useful on Windows, where you'd likely use a directory such as C:home.

These Listener elements, if present, must be inside of a Host element, but not inside of a Context element, as they apply to the Host itself.

8. Using CGI Scripts with Tomcat
Tomcat is primarily meant to be a servlet/JSP container, but it has many capabilities rivalling a traditional web server. One of these is support for the Common Gateway Interface (CGI), which provides a means for running an external program in response to a browser request, typically to process a web-based form. CGI is called "common" because it can invoke programs in almost any programming or scripting language: Perl, Python, awk, Unix shell scripting, and even Java are all supported options. However, you probably wouldn't run a Java application as a CGI due to the start-up overhead; elimination of this overhead was what led to the original design of the servlet specification. Servlets are almost always more efficient than CGIs because you're not starting up a new operating-system-level process every time somebody clicks on a link or button.

Tomcat includes an optional CGI servlet that allows you to run legacy CGI scripts; the assumption is that most new back-end processing will be done by user-defined servlets and JSPs.

To enable Tomcat's CGI servlet, you must do the following:

Rename the file servlets-cgi.renametojar (found in CATALINA_HOME/server/lib/) to servlets-cgi.jar, so that the servlet that processes CGI scripts will be on Tomcat's CLASSPATH.

In Tomcat's CATALINA_BASE/conf/web.xml file, uncomment the definition of the servlet named cgi (this is around line 241 in the distribution).

Also in Tomcat's web.xml, uncomment the servlet mapping for the cgi servlet (around line 299 in the distributed file). Remember, this specifies the HTML links to the CGI script.

Either place the CGI scripts under the WEB-INF/cgi directory (remember that WEB-INF is a safe place to hide things that you don't want the user to be able to view, for security reasons), or place them in some other directory within your context and adjust the cgiPathPrefix initialization parameter of the CGIServlet to identify the directory containing the files. This specifies the actual location of the CGI scripts, which typically will not be the same as the URL in the previous step.

Restart Tomcat, and your CGI processing should now be operational.

The default directory for the servlet to locate the actual scripts is WEB-INF/cgi. As has been noted, the WEB-INF directory is protected against casual snooping from browsers, so this is a good place to put CGI scripts, which may contain passwords or other sensitive information. For compatibility with other servers, though, you may prefer to keep the scripts in the traditional directory, /cgi-bin, but be aware that files in this directory may be viewable by the curious web surfer. Also, on Unix, be sure that the CGI script files are executable by the user under which you are running Tomcat.

9. Changing Tomcat's JSP Compiler
In Tomcat 4.1 (and above, presumably), compilation of JSPs is performed by using the Ant program controller directly from within Tomcat. This sounds a bit strange, but it's part of what Ant was intended for; there is a documented API that lets developers use Ant without starting up a new JVM. This is one advantage of having Ant written in Java. Plus, it means you can now use any compiler supported by the javac task within Ant; these are listed in the javac page of the Apache Ant manual. It is easy to use because you need only an <init-param> with a name of "compiler" and a value of one of the supported compiler names:


<servlet>
    <servlet-name>jsp</servlet-name>
    <servlet-class>
      org.apache.jasper.servlet.JspServlet
    </servlet-class>
    <init-param>
      <param-name>logVerbosityLevel</param-name>
      <param-value>WARNING</param-value>
    </init-param>
    <init-param>
      <param-name>compiler</param-name>
      <param-value>jikes</param-value>
    </init-param>
    <load-on-startup>3</load-on-startup>
</servlet>
Of course, the given compiler must be installed on your system, and the CLASSPATH may need to be set, depending on which compiler you choose.

10. Restricting Access to Specific Hosts
Sometimes you'll only want to restrict access to Tomcat's web app to only specified host names or IP addresses. This way, only clients at those specified sites will be served content. Tomcat comes with two Valves that you can configure and use for this purpose: RemoteHostValve and RemoteAddrValve.

These Valves allow you to filter requests by host name or by IP address, and to allow or deny hosts that match, similar to the per-directory Allow/Deny directives in Apache httpd. If you run the Admin application, you might want to only allow access to it from localhost, as follows:


<Context path="/path/to/secret_files" ...>
  <Valve className="org.apache.catalina.valves.RemoteAddrValve"
         allow="127.0.0.1" deny=""/>
</Context>

If no allow pattern is given, then patterns that match the deny attribute patterns will be rejected, and all others will be allowed. Similarly, if no deny pattern is given, patterns that match the allow attribute will be allowed, and all others will be denied.


***** 아름다운프로님에 의해서 게시물 복사 + 카테고리변경되었습니다 (2003-12-18 17:36)
Posted by 아름프로
산업자원부 기술표준원과 정보통신부 산하 한국정보통신기술협회(TTA)가 차세대 전자상거래표준인 ebXML 솔루션용 테스트베드 개발에서 공조하기로 했다. 이에 따라 범국가 차원에서 보다 완성도 높은 단일 테스트베드가 개발될 수 있을 전망이다. 또 이들 외에 한국전산원 등 3개 기관이 각각 테스트베드 개발에 나섬으로써 업계 혼선가중 및 예산낭비라는 지적도 면할 수 있게 됐다.
17일 관련기관 및 업계에 따르면 기술표준원은 TTA에 ebXML 솔루션 테스트베드 개발을 위한 민관 컨소시엄(KORBIT)에 대한 참여를 정식 요청했으며 이에 대해 TTA측에서 참여의사를 밝힌 것으로 알려졌다. 이에 앞서 정보통신부는 ebXML 솔루션 테스트베드의 주무기관으로 TTA를 선정한 바 있다. 이에 따라 우리나라의 ebXML 솔루션용 테스트베드는 미국과 일본처럼 명실공히 단일 국가표준 형태로 개발될 수 있게 됐다.


TTA 소프트웨어인증센터의 신석규 센터장은 “KORBIT 참여를 통해 개발에 보다 시너지 효과를 발휘할 수 있을 것으로 예상돼 (상급부처가 다른) 기표원 프로젝트에 참여하기로 결정했다”고 밝혔다. TTA는 이에 따라 이달 말에 열리는 KORBIT 전문가회의부터 참여할 예정이다.
◇공조 의의=TTA가 기표원 주도로 결성된 민관컨소시엄인 KORBIT에 참여키로 함에 따라 범국가적인 완성도 높은 테스트베드 개발이 이뤄질 수 있을 것으로 기대된다. 특히 기표원이 미국에서 테스트베드를 개발하고 있는 상무성 산하 국가표준기술연구소(NIST)와 이미 공조를 약속한 상황이어서 이런 가능성을 더하고 있다.
이에 따라 범아시아권의 ebXML 솔루션 인증제도와 관련 일본과의 경쟁에서 밀릴 수 있다는 우려도 불식시킬 수 있게 될 전망이다. 일본은 전자상거래추진협의회(ECOM)가 민관지원을 등에 업고 테스트베드를 개발하고 있으며 이를 ebXML아시아위원회를 통해 범아시아 표준으로의 승인을 추진하고 있는 것으로 알려져 있다.
 기표원 이재만 연구관은 “KORBIT이 일본과 비교해 뒤늦게 결성되는 등 다소 개발진척도가 낮은 상태였지만 이번 TTA의 참여를 계기로 큰 변화의 계기가 될 것”이라며 “이를 통해 일본에 인증권이 넘어가는 것을 막을 수 있을 것으로 기대된다”고 밝혔다. 여기에 여러개의 테스트베드 개발에 따른 업계 혼란 가중이라는 우려도 불식시킬 수 있을 전망이다.
◇향후전망=TTA가 그동안 개발한 테스트베드의 소스를 일시에 공개할 수는 없지만 KORBIT이 개발하는데 상당한 도움이 될 것으로 기대된다. 신석규 센터장은 “테스트베드를 연구과제로 수행해 왔기 때문에 저작권 문제 등 해결해야 할 과제가 많다”며 “그러나 범정부 차원에서 테스트베드는 하나로 가야하는데는 이의를 달 수 없기 때문에 문제를 해결해 나가겠다”고 밝혔다. 이에 따라 TTA측은 그동안 개발하는 과정에서 축적된 노하우를 제공하는 식으로 KORBIT의 개발을 지원할 것으로 예상된다.
한편 KORBIT은 늦어도 연내에 1차 테스트베드를 개발해 TTA와 함께 메시지 상호운용성을 시험할 예정이다.
 <김준배기자 joon@etnews.co.kr>  
○ 신문게재일자 : 2003/06/18


***** 아름다운프로님에 의해서 게시물 복사 + 카테고리변경되었습니다 (2003-12-18 17:13)
Posted by 아름프로
INDECS의 가장 중요한 파트너는 DOI 관리 및 보급을 담당하는 IDF다. 그것은 DOI가 전자상거래에서 식별자와 위치 정보, 저작권 소유 기관 정보 등을 포함하고 있고, 인덱스는 저작물의 카탈로그 정보, 계약 정보, 거래 정보를 포함할 수 있는 상호보완적 구조를 가지기 때문이며, DOI는 미국에서 인덱스는 유럽에서, 또한 유사한 시기에 진행중인 프로젝트기 때문이다.


***** 아름다운프로님에 의해서 게시물 복사 + 카테고리변경되었습니다 (2003-12-18 17:01)
Posted by 아름프로

식별자 ...

2003. 6. 25. 00:19
작업에 대한 식별자로는 ISWC·ISAN·PII·DOI 등이 있으며,
표현에 대한 식별자로 ISRC·UMID·DOI 등이 있으며, 그리고
실현에 대한 식별자로 ISBN·ISSN·UPC/EAN·DOI 등이 있다.


***** 아름다운프로님에 의해서 게시물 복사 + 카테고리변경되었습니다 (2003-12-18 17:01)
Posted by 아름프로
국내 음악 기술 주도 단체


국내 음악 기술을 주도하는 단체는 전자 부품 연구원이 주도하는 DMC 와 SDM와 전자통신 연구소가 주축인 DRM Forum이 있다. 현재는 DRM Forum을 중심으로 많은 활동들이 이루어지고 있다. 모든 디지털 상품중에서 음악 분야 기술이 다른 분야에 가장 큰 영향을 주고 있기 때문에 DRMKorea의 역활은 매우 중요하다고 할 수 있을 것이다.  SDM은 슈퍼디스트리뷰션 기술의 참여가 소극적이었으며 진행 및  결과도 매우 만족할 수 없는 수준이었다고 할 수 있다. SDM은 AOD기술을 중심으로 운영되었고 기술을 유통인프라 측면을 무시한 단순 복제방지 기술로 한정지어 적절한 목표를 갖고 있는가에도 의문이 있었다고 할 수 있다.  

DMC/SDM (http://www.ksdm.or.kr/ )
그동안 중심적 역활을 하였으나 지금은 활동이 미약하다.  

DRM Forum(http://www.drm.or.kr/ )
현재 전체 디지털 저작권 관리 기술 분야의 연구 중심이라고 할 수 있다.

SEDICA (http://www.sedica.or.kr/)


***** 아름다운프로님에 의해서 게시물 복사 + 카테고리변경되었습니다 (2003-12-18 17:02)
Posted by 아름프로
SDMI(Secure Digital Music Initiative)
http://www.sdmi.org/

인터넷 음반업체 컨소시엄인  SDMI(Secure Digital Music Initiative)는  음악파일 포맷개발과 판매방식 개선 등 디지털 음악파일과 관련한 업계 표준화를 추진하는 목표를 가지고 미국 음반산업협회(RIAA)에 의해 구성되었다.

 이 조직은 세계 DRM 분야 표준활동에 중심적인 역활을 하고 있다.  SDMI가 추구하고 있는 스크리닝 테크놀로지의 근간은  워터마킹 기술이다. 워터마킹 기술은 저작권을 강제화 할 수 없다는 점 때문에 최근에는 사후 저작권 침해 추적을 위한 용도로 역활이 축소되고 있다. 또한 최근에는 그 안전성에 대한 문제 제기가 있어 기술 표준 작업에는 커다란 차질이 생기고 있다.


 C넷, 뉴욕타임스 등 주요 외신에 따르면 프린스턴 대학의 에드워드 W 펠튼 박사 연구팀은 최근 풀어낸 4가지 워터마크 스킴 공개 계획에 대해 SDMI(Secure Digital Music Initiative)가 법적 대응을 경고해옴에 따라 이를 철회하였다.

 이번 문제제기는  제록스 팰러앨토연구소센터와 라이스대학 과학자들을 포함한 펠튼 박사팀이 SDMI가 디지털음악저작권보호시스템 테스트를 위해 지난해 9월 개최한 콘테스트에 참여해 워터마크의 스킴을 풀어내면서 시작됐다. 펠튼 박사는 이후 웹사이트( http://www.cryptome.org )에 크래킹 과정을 올려 놓은 데 이어 피츠버그에서 열리는 제4회 국제정보은폐워크숍에서도 이를 공개할 계획이었다.


 이에 대응해 SDMI는 서기인 메튜 오픈하임 명의의 편지를 펠튼 박사에게 보내 크래킹 내용을 공개할 경우 98년 제정된 디지털밀레니엄지적재산권법을 앞세워 법적 대응에 들어갈 방침임을 알렸었다.
 비록 SDMI가 펠튼 박사의 공개 계획을 저지하기는 했지만 체면은 구겨질 대로 구겨졌다. 이번 사건을 통해 이론상으로는 사운드나 이미지의 품질을 손상시키지 않고 제거할 수 없는 것으로 알려진 워터마킹 기술이 완벽한 보안을 보장해주지 못한다는 점이 밝혔지게 됐기 때문이다.

 이렇게 되자 전문가들은 워터마킹은 불법적인 재생산을 막기 위한 목적보다는 콘텐츠의 추적에 더 알맞다고 지적하고 있다. 사용자가 키를 갖고 있지 않으면 파일을 뒤섞어 복제를 막는 암호화와는 달리 워터마킹은 파일의 불법사용을 근본적으로 막을 수 없다는 점 때문이다.
 워터마크의 취약점이 잇따라 발견되자 히타치, 매크로비전, NEC, 필립스일렉트로닉스, 파이어니어, 소니 등 가전 업체들은 최근 디지털워터마킹 기술에 기반을 둔 새로운 비디오 복사방지 스킴을 만들기 위해 협력키로 하고 비디오워터마킹그룹을 구성하고 나섰다.


***** 아름다운프로님에 의해서 게시물 복사 + 카테고리변경되었습니다 (2003-12-18 17:01)
Posted by 아름프로
MARC(Machine Readable Cataloging)

http://www.loc.gov/marc

MARC는 전자책 분야의 표준으로서 각국의 주요 도서관을 중심으로 발전해 오고 있다. 1960년대초 미국의 많은 도서관들의 가장 큰 문제점은 목록작업을 수작업으로 하기에는 너무 방대하다는 것이었다. 그래서 많은 도서관들은 의회도서관(LC)에 기계가독형 목록 데이터베이스를 생산하여 줄 것을 요청하게 되었다. 1966년 11월부터 1968년 6월까지의 MARC 파일럿 프로젝트기간을 거치게 되는데 그당시 LC는 영국국가서지국(BNB)과협력하여 MARC2 혹은 지금의 단지 MARC로 더 많이 알려진 새로운 레코드 포맷의 설계에 밀접한 협력이 이루어졌다. 그때당시 이 포맷이 목표로 한것은  서지 데이터의 재조직이 가능한 자기 테이프로써 서지기술을 전달하고자 하는 것이었다. 그리하여 LC는 1969년 3월부터는 MARC2포맷에 따른 MARC 테잎이 생산되어 구독을 원하는 각 도서관에 배포되기 시작하였다.


MARC를 전면적으로 시행하려면 먼저 도서관의 전 장서가 MARC 포맷의 레코드를 필요로 하게 되자 소급자료의 화일변환이 문제가 된다는 것을 알았다. 그래서 1970년 소급변환프로젝트인 RECON(Retrospective Conversion)이 미국에서 시작되기도 했다.

MARC이후에 나타난 목록시스템의 전산화의 특징은 온라인 도서관네트워크 통한 공동편목 및 목록 생산시스템의 전산화이다. OCLC, RLIN, WLN 등이 그 대표적인 예이다.

DC(Dublin Core)

DC는 네트워크 환경에서 상거래를 수반하는 모든 정보 자원을 기술하기 위한 메타데이터이며  1995년 미국 더블린 OCLC/NCSA DC 1차 워크샵에서 처음으로 성격을 규정하였다.  이 것은 MARC의 복잡한 구조에 대한 대안으로 제시되었다. 현재 15개의 메타데이터 구성 요소를 확정하였다. 확장성을 위한 한정어를 포함하며 한정어는 언어, 스킴, 하위요소 세가지로 구성된다.  


MARC포맷


MARC포맷은 세가지 기본요소로 이루어진다. 첫째는 레코드의 기본구조로서 다음과 같이 리더 (leader), 레코드디렉토리(record directory), 데이터필드(data fields)로 구성되고 데이터필드 부는 다시 제어필드(control fields)와 가변장필드(variable fields)로 나뉜다.

+------------+---------------------+--------------+------------------------+
|  리    더  |   레코드 디렉토리   |   제어필드   |        가변장필드      |
+------------+---------------------+--------------+------------------------+
+-----+------+-----------+---------+--------------------+------------------+
     24자      12자×데이터필드수+1             코드데이터 및 서지데이터

둘째 요소는 레코드내의 데이터를 식별하는 식별기호 내지는 식별방법으로 각각의 서지데이터 를 구별하는 세자리 숫자인 태그(Tags), 각 가변장필드에 대한 부수적인 정보를 제공하는 두자리 코드인 지시기호(indicators)가 사용된다.
셋째 요소는 데이터필드에 수록된 데이터 자체를 말한다.

가. 리더
리더는 24자로 구성되는 고정장필드로 내용은 다음가 같다.


  데이터 요소                    위치            길이(자수)
-----------------------------------------------------------
  레코드 길이                      0-4                 5
  레코드 상태                        5                 1
  레코드 유형                        6                 1
  서지형식                           7                 1
  공란                             8-9                 2
  지시기호 자수                     10                 1
  식별기호 자수                     11                 1
  데이터의 기본번지              12-16                 5
  입력수준                          17                 1
  공란                           18-19                 2
  레코드디렉토리 엔트리맵        20-23                
    데이터필드 길이                 20                 1
    시작위치 길이                   21                 1
    미사용                       22-23                 2

1) 레코드 길이(record lenth)
레코드의 길이는 리더, 레코드 디렉토리, 제어필드, 가변장필드를 포함한 전체길이로 숫자는 우측으로 맞추고 앞은 0으로 채운다.
예) 01543. 00543

2) 레코드의 상태(record status)
화일유지를 위하여 사용하는 한 자의 코드로 각 레코드의 상태를 나타내는 코드는 다음과 같 다.


n: 신규레코드
c: 변경된 레코드
d: 삭제된 레코드

3) 레코드의 유형(types of record)
레코드의 유형을 나타내는 한 자의 코드로 각 코드별 의미는 다음과 같다.


a: 인쇄된 레코드
b: 필사본 레코드
c: 인쇄된 악보
d: 필사본 악보
e: 인쇄된 지도자료
f: 필사본 지도
g: 영화필름 및 필름스트립
h: 마이크로자료
i: 비음향자료
j: 음향자료
k: 그림, 도면 등 이차원자료
l: 기계가독형데이터
x: 전거데이터-이름
y: 전거데이터-주제

4) 서지형식(bibliographic level)
레코드의 서지형식을 나타내는 한 자의 코드로서 사용되는 코드 및 그 의미는 다음과 같 다.


a: 분립(analytic)
m: 단행본(monograph)
s: 연속간행물(serial)
c: 전집(collection)

5) 지시기호 자수(indicator count)

6) 식별기호 자수(subfield code count)
지시기호와 식별기호의 자수는 항상 두 자이므로 각각 2가 된다.

7) 데이터의 기본번지(base address of data)
전체 레코드에서 첫번째 데이터필드의 시작위치를 나타낸다. 따라서 기본번지는 리더와 디렉토 리의 길이에 필드종료기로(field terminator)에 소요되는 한 자를 합한 수가 된다. 예를 들면 레 코드가 15개의 항목을 가진 180자 짜리 디렉토리를 갖고 있을 경우 데이터의 기본번지는 24(리 더)+180(디렉토리)+1, 즉 205가 된다. 기본번지는 다섯 자리 숫자로 표시되며 우측으로 맞추고 좌측은 0으로 채워줌으로서 위의 예에서는 00205가 된다.

8) 입력수준(encoding level)
입력된 레코드의 완선성 여부를 나타내는 한 자로 된 코드이다.


b: 완전수준, 즉 입력레코드가 자료자체를 보고 기술한 목록일때
1: 불완전수준, 즉 출판 이전의 목록 등 자료 자체를 보지 않고 기술한 목록일 때

9) 엔트리 맵(entry map)
레코드 디렉토리 엔트리의 구조를 기술하는 것으로 데이터필드의 길이는 네 자이므로 첫 자리 에는 4가 오고 데이터필드의 시작위치를 나타내는 숫자는 다섯자리이므로 둘째자리에는 5가 온 다. 마지막 두 자리는 현재는 사용하지 않으며 0으로 채워진다.


나. 레코드 디렉토리
레코드 디렉토리는 책의 목차와 같은 것으로 데이터필드부에 속하는 각 데이터필드의 길이와 위치를 지시해주는 정보를 포함하고 있으며 각 디렉토리 항목(directory entry)의 길이는 12자이 다.
각 디렉토리 항목은 아래와 같이 태그, 데이터필드 길이, 시작번지로 구성되어 있다.


             +-------------+-----------------+--------------------+
             |    태그     | 데이터필드 길이 |      시작번지      |
             +-------------+-----------------+--------------------+

태그는 각 데이터필드를 식별하여 주는 세자리 숫자로 된 코드로 001에서 945까지 사용가능하 다. 데이터필드의 시작번지는 데이터필드부내에서의 데이터필드의 시작위치를 나타내는 상대적인 위치가 된다.

다. 제어필드
제어필드는 001에서 009까지의 태그를 사용한다. 제어필드는 지시기호와 식별기호를 사용하지 않으며 각 필드는 필드종료기호로 끝난다.

1) 001제어번호(control number)
이 필드에는 LC 카드번호가 입력된다. UK MARC에서는 여기에 ISBN이나 ISBN이 없는 경우에는 BNB번호를 입력하고 LC카드번호는 010 가변장필드에 입력한다. KORMARC포맷에서는 국립중앙도서 관의 제어번호를 사용하도록 하였다. 만일 국립중앙도서관 이외의 도서관에서 자관의 등록번호를 제어번호로 사용하고자 할 때에는 국립중앙도서관의 제어번호를 012필드에 옮기고 자관의 제어번 호를 001필드에 입력시키면 된다.

2) 008부호화정보필드
이 필드에는 부호로써 표시되는 데이터요소가 입력되며 길이는 40자이다. 각 데이터요소의 위 치와 길이는 다음과 같다.


   데이터 요소                             위치            길이
----------------------------------------------------------------
입력일자                                   0-5               6
출판년유형번호                               6               1
출판년1                                   7-10               4
출판년2                                  11-14               4
출판국명번호                             15-17               3
삽도부호                                 18-21               4
지식수준부호                                22               1
복제형태부호                                23               1
내용형식부호                             24-27               4
정부간행물표시기호                          28               1
회의간행물표시기호                          29               1
기념논문집표시기호                          30               1
색인표시기호                                31               1
표제문단에 중복기입된 기본기입표시기호      32               1
문학형식부호                                33               1
전기부호                                    34               1
언어부호                                 35-37               3
수정된 레코드표시기호                       38               1
목록정보원부호                              39               1


***** 아름다운프로님에 의해서 게시물 복사 + 카테고리변경되었습니다 (2003-12-18 17:01)
Posted by 아름프로

INDECS

2003. 6. 24. 23:50
INDECS( INteroperability of Data in E-Commerce Systems)
http://www.indecs.org   - <indecs>™ Framework Ltd 는 인덱스 결과에 대한 국제적인 확산과 계속적인 개발을 위해 설립된  비영리 단체이다.  2001/09 현재 회원은 Kopiosto, CAL, Editeur, IFPI, MUZE Inc. , IDF 등이 있다

DOI와 별도로 유럽에서는 98년 많은 국제 저작권(Intellectual Property Rights) 관련 단체들이 모여 음반·도서·필름·사진 등의 구별되던 전통적인 디지털 콘텐츠 분야(sectors)의 경계가 디지털 환경에서 무너지고 있다는 데 인식을 같이 하였으며, 기존에 추진되어오던 개별적인 저작권 보호 시스템을 통일된 형태의 프레임워크로 추진하자는 데 합의하였다.
98년 11월부터 추진한 INDECS 프로젝트는 99년 4월 1차 초안, 7월에 2차 초안이 제출되었으며, 99년 10월 제네바에 있는 WIPO에서 최종 검토를 거쳐서, 2000년 3월 시드니에서 최종 결과에 대한 평가회의를 끝으로 전체 일정이 종료되었다.
인덱스 프로젝트의 종료는 저작권 사회의 메타 데이터 프레임워크가 끝났다는 표시가 새로운 단계에 접어들었다는 것을 보여준다.
인덱스는 전통적인 메타데이타인 더블린 코아(DC:Dublin Core)와 같은 자원 기술을 가지고 있으나, 인간(법률적·자연적)과 지적재산권 계약 그리고 이들 사이에 연결 요소를 추가적으로 포함하고 있다. 이 모델의 기초는 94년에 계획된 CIS와 ISWC, ISAN(International Standard Audiovisual Number)에 대한 ISO의 제안서다.
INDECS는 몇 가지 특징을 갖는다. 첫째 논리적 측면에서는 IFLA FRBR 모델을 사용해 모든 정보 자원을 4가지 형태 중 하나로 규정한다. 즉 원 창작자는 추상적인 작업(Work)을 인식하며 그것을 표현, 또는 공연을 통해 실현한다. 같은 작업이 다양한 형태의 표현을 가질 수 있으며, 각 표현은 실현(Manifestation)을 통해 구체화된다. 즉 공연의 비디오 테이프·CD·인쇄 형태가 그것이다.
실현이 대량 제작될 때 각 실현은 많은 항목에 의해 나타난다. 많은 작업이 하나의 표현과 실현을 가지고 있지만, 성공적인 작업은 많은 장르로, 여러 번 표현되고 여러 번 실현되기도 한다. 그러나 미술 작품과 표본 같은 것은 대량의 실현이 될 수 없다. 이러한 분석은 권리의 다양한 가능성을 제공해 준다. 예를 들어 음악이나 시청각 CD(실현)는 음악(작업)의 공연(표현) 기록까지도 포함하며 이들은 서로 다른 식별체계(UPC/EAN·ISRC·ISWC)와 메타데이타 그리고 다른 권리 소유자를 발생시킬 수 있다. 참고적으로 작업에 대한 식별자로는 ISWC·ISAN·PII·DOI 등이 있으며, 표현에 대한 식별자로 ISRC·UMID·DOI 등이 있으며, 그리고 실현에 대한 식별자로 ISBN·ISSN·UPC/EAN·DOI 등이 있다.
인덱스 모델의 두 번째 특징으로 저작권(IPR:Intellectual Property Rights) 처리에 있다. 즉 인덱스 모델은 정보 자원에 대한 소유권 이전 가능성과 다양한 역할을 제공하는 기능을 포함하고 있다. 작업에 대해 누가 표현(공연)하고, 실현하고, 제작하고, 소유하고 있는가만으로 충분하지가 않다. 작업·표현·실현 항목에 관한 부분 인용·변형·사용·편집을 포함한 시공간상의 권리 관리를 지원해야 하며, 재생산 권리·통신권·공연권·전송권·편집권·방송권·배포권·공중 전달권·통합권·전시권 등을 포함하는 권리가 처리되어야 한다.
인덱스 모델의 또 다른 특징은 상거래 트랜잭션에 대한 투명한 정보를 제공한다. 모든 트랜잭션은 이벤트로 자동 처리되며, 발생되는 트랜잭션 정보가 누적 기록됨으로써 금전등록기와 같은 역할을 제공하기 때문이다. 이와 같은 상거래 정보는 저작자를 위한 로열티 배분을 분명하게 해주며 향후 세금 부과, 법적 문제 해결 자료 그리고 사용 통계 등을 추출하는 중요한 정보가 될 것이다.
현재 전세계적으로 논란이 되고 있는 상거래의 과세는 많은 나라에서 유보한 상태지만 OECD는 최근에 국제간 전자상거래의 과세를 권고하고 있고, 중국·일본 등은 이미 조사작업을 착수한 것을 보면 인덱스와 같은 체계는 전자상거래에서 매우 중요한 역할을 할 것이다.
인덱스 기술은 기존의 CISAC·BIEM·FIAPF·EBU·SMPTE·AEPO·IFLA·OCLC·EDITEUR·IPA·STM·FEP·NFAIS·IFMP·IFPI 등의 단체에서 제안하는 식별자 또는 메타데이타와 호환성을 갖게 설계되었으며, 특히 교환을 위한 RDF(Resource Description Framework) 모델을 채택하고 있다. 또한 현재 이슈화되고 있는 MPEG-7, MPEG-21의 권리와 상거래에 대한 보완적 요소를 제공하고 있다.
INDECS의 가장 중요한 파트너는 DOI 관리 및 보급을 담당하는 IDF다. 그것은 DOI가 전자상거래에서 식별자와 위치 정보, 저작권 소유 기관 정보 등을 포함하고 있고, 인덱스는 저작물의 카탈로그 정보, 계약 정보, 거래 정보를 포함할 수 있는 상호보완적 구조를 가지기 때문이며, DOI는 미국에서 인덱스는 유럽에서, 또한 유사한 시기에 진행중인 프로젝트기 때문이다.
DOI는 99년 NISO 표준으로, 99년 7월 W3C에 제출된 형태의 기술이며, INDECS는 99년 9월 국제저작권협회(WIPO)의 검토를 거쳐 ISO/IEC, W3C에 제출되었다.
2000년 3월 인덱스 3차 평가회의에서 발표한 Chris Barlas의 발표 내용에는 유럽의 EDItEUR 기관이 INDECS의 응용 모델로 EPICS( http://www.bic.org.uk ) 개발해 3월중에 제공하고, 최근 인터넷서점이 아마존에서는 미국출판문화협회와 공동으로 Onix(On-line eXchange)라는 INDECS 부분 집합을 가진 시스템을 개발중이라고 발표하였다.
INDECS, DOI 그리고 관련법인 WCT는 현재 저작권 단체들이 만들어 놓은 다양한 법적·기술적·경제적 구조를 디지털 사회에서 보장 받기 위한 체계로 매우 중요한 기술적 사항이다.  

디지털콘텐츠식별자(DOI) 관련 공인인증기관(RA)인 엔피아시스템즈(http://www.enpia.co.kr)는   DOI시장 활성화를 위해 ‘DOI RA 운영센터(DROC)’
설립을 추진하고 있다.  


***** 아름다운프로님에 의해서 게시물 복사 + 카테고리변경되었습니다 (2003-12-18 17:00)
Posted by 아름프로

DOI

2003. 6. 24. 23:49
DOI(Digital Object Identifier)

http://www.doi.org

DOI(Digital Object Identifier)는 모든 도서에 부여되는 ISBN 번호체계처럼 인터넷의 디지털 콘텐츠에 적용해 인터넷 상거래를 자동화하고, 저작권를 보호하기 위한 새로운 형태의 식별자 시스템으로 미국출판협회(AAP)가 지난 94년에 최초로 제안되었다. 97년 10월에는 미국의 CNRI(The Corporation for National Research Initiatives· http://www.cnri.reston.va.us )가 DOI 체계를 DOI 서버와 클라이언트 플러그인을 통해 구현한 핸들 시스템을 개발해 프랑크푸르트 도서전에서 발표함으로써 DOI의 활용 가능성을 선보인 바 있다.


그 후 국제DOI재단(IDF:International DOI Foundation)이 설립돼 DOI 표준화 및 DOI 운영 에이전시 체계의 구축 그리고 DOI 응용 사업의 다각화, 세계적인 확산을 체계적으로 주도해오고 있다. 1999년 프랑크푸르트에서 열린 국제 도서전에서는 여러 출판 회사가 공동으로 개발한 DOI-X라는 DOI를 이용한 응용 기술을 시연한 바 있다.
DOI-X는 한 마디로 참조 연계(Reference Linking) 시스템이다. 논문이나 기사를 쓰다 보면 반드시 참조한 논문이나 기사를 기입하는데, 인터넷에서는 보통 이를 URL로 표시해 연결해 둔다. 그런데 참조 논문의 위치, 즉 URL이 바뀌면 그 논문을 참조한 모든 문헌도 URL을 다시 수정해야 하는 불편과 비용이 발생하게 된다. DOI-X는 참조 문헌의 연결 서비스를 URN 개념인 DOI를 사용해 구현함으로써 기존의 URL 체계로는 불가능한 문헌의 연결 서비스와 디지털 라이브러리의 참조 연계 서비스를 영원히 보장한다.
또한  DOI-R는 DOI를 이용해 저작권 소유자와 판매자 사이에 발생할 수 있는 각종 계약과 권리에 관한 정보를 기술하는 것으로 「INDECS」의 개발 일정과 병행해 나아가고 있다.
DOI 체제는 출판물 등 텍스트 정보분야에서 출발하였지만 현재는 음악·영화·애니메이션과 같은 모든 디지털 콘텐츠 더 나아가 각종 제품의 인터넷 유통에도 적용할 수 있게 그 응용 분야가 확대되었다.
디지털 자원에 대한 식별자로써 부각되고 있는 DOI가 기존의 식별자와 다른 가장 큰 특징은 DOI 자체가 유통 개념을 포함하고 있다는 것이다. 또한 기존의 식별자 또는 코드 체계와 상충되지 않는 포괄적 개념을 가지고 있다.
DOI는 HTTP 프로토콜에서 사용하는 URL(Universal Resource Locators)과 유사한 URN(Universal Resource Names) 체계를 가지고 있다. DOI는 URN 개념을 구현할 수 있는 방식의 하나로 웹에서 변하지 않는 체계를 가지고 있으며, DOI 서버는 URC(Universal Resource Characteristics)의 역할을 제공한다. 그러므로 DOI 서버는 보내진 DOI에 대하여 현재의 URL을 자동적으로 제공하는 기능을 가지고 있다.
DOI를 활용한 정보의 접근은 URL과 다르게 영원히 변하지 않으므로 DOI를 활용하면 URL 사용시 발생할 수 있는 여러 가지 문제를 보완할 수 있게 된다. DOI의 또 다른 특징은 ISWC(International Standard Work Code), WID(Work Information Database), CSD(CISAC Standard Database), IPI(Interested Party Information), ISBN(International Standard Book Number) 등과 같은 기존의 식별자 체계를 수용하는 것이다. 즉 DOI 일부로 기존의 식별자를 수용해 기술할 수 있으며, NISO(National Information Standard Organization)는 기존의 식별자 체계를 DOI 내부에 사용하는 것을 권장하고 있다. 그리고 DOI는 99년 9월 NISO의 표준 구문으로 채택된 바 있다.
IDF는 기술적인 부분이 마무리됨에 따라 각 나라별로 DOI를 서비스할 수 있는 레지스트레이션 에이전시(RA) 운영을 위해 모든 노력을 집중하고 있다. DOI는 DOI 번호를 매길 수 있는 권한을 가진 RA를 필요로 하며, 이러한 기관은 특별한 언급은 없지만 국가별로 1개 기관이 선정될 것으로 예상되고 있다. RA 선정의 초기로 2000년 10월 프랑크푸르트 도서전에서는 최소한 1개의 RA를 지정·운영할 예정임을 IDF 측에서는 밝히고 있다.
DOI와 유사한 기능을 하면서 DOI를 대체할 수 있는 기술로 제시된 방법이 현재까지는 나타난 바 없다. 그러므로 전자상거래와 저작권 처리를 위한 식별자로써 현재의 DOI가 유일한 해결책으로 보인다.
전자상거래나 Data Archives의 구축에서 전통적 URL을 이용하면 자주 변하는 URL 때문에 DB의 신뢰성이 떨어진다. 이를 피하자면 계속적으로 URL 관리를 하지 않으면 안 되고, 관리가 소홀하면 많은 DB 또는 콘텐츠 내부에 표시된 연계(linking) 마크 정보가 잘못된 URL을 표시해 유용성이 떨어지게 된다.
이로 인하여 서비스의 신뢰성을 잃게 됨으로써 전자상거래 시스템이나 Data Archives가 제대로 역할을 하지 못할 것이다. 반면에 DOI는 영원히 변하지 않는 URN 체계기 때문에 DB 내에 URL 대신에 DOI를 사용함으로써 DB 내의 임의의 자료가 항상 유용함을 보장해준다. 해당 DOI의 물리적 위치 변화는 전자상거래 업체나 Data Archives의 책임이 아니라 DOI RA가 관리해주는 체계로 구성된다. 즉 현실세계의 전화번호 서비스 기관인 114와 같은 역할을 DOI RA가 한다. 즉 DOI는 114 메타포 체계를 가진다고 이해하면 쉽게 납득할 수 있다. 회사가 만일 이사를 가서 전화번호가 바뀐다면 우리는 114 서비스를 통해 해당 회사의 현재 전화번호를 물어 이를 알 수 있게 된다. 마찬가지로 원하는 정보의 URL 변경을 DOI RA에 등록하면 URL이 바뀌어도 누구든 DOI 서버를 통해 찾고자 하는 정보나 콘텐츠를 서비스받을 수 있다. 회사명이 DOI에 해당되고 전화번호가 URL에 해당된다고 할 수 있다.


디지털콘텐츠식별자(DOI) 관련 공인인증기관(RA)인 엔피아시스템즈(http://www.enpia.co.kr)는   DOI시장 활성화를 위해 ‘DOI RA 운영센터(DROC)’
설립을 추진하고 있다.  


***** 아름다운프로님에 의해서 게시물 복사 + 카테고리변경되었습니다 (2003-12-18 17:00)
Posted by 아름프로
DRM 기술 및 표준화

■ W3C(World Wide Web Consortium) DRM
■ SDMI(Secure Digital Music Initiative)
■ OeBF(Open eBook standard Forum)
■ IETF-IDRM
■ CPTWG (Copy Protection Technical Working Group)
■ DOI
■ INDECS(INteroperability of Data in E-Commerce System)

에 관한 간단한 설명..


***** 아름다운프로님에 의해서 게시물 복사 + 카테고리변경되었습니다 (2003-12-18 16:57)
Posted by 아름프로

DMCA

2003. 6. 24. 21:50
디지털밀레니엄저작권법 (digital millennium copyright act)

미국의 '디지털 밀레니엄 저작권법'(dmca)은 1996년 채택된 'wipo저작권조약'과 'wipo실연 및 음반조약'의 이행, 그리고 디지털시대의 새로운 저작권보호를 모색하기 위해 1998년 10월에 제정되었으며, 온라인저작권을 강화하고 이를 방해하는 기술개발을 불법화하는 것을 주내용으로 하고 있다.

이법은 제1부에서 wipo저작권 조약 및 실연·음반조약의 이행에 대해, 제2부에서 온라인서비스제공업자의 책임제한에 대해, 제3부에서 컴퓨터 유지보수 목적의 복제에 대한 면책에 대해, 제4부에서 기타 규정으로 저작권청의 기능 및 원격교육, 도서관 및 기록보관소, 일시적기록물에 대한 면책 및 영상저작물의 권리이전에 관한 게약상의무의 추정 규정에 대해, 제5부에서 선박디자인에 대한 보호에 대해 규정하고 있다.


***** 아름다운프로님에 의해서 게시물 복사 + 카테고리변경되었습니다 (2003-12-18 17:00)
Posted by 아름프로
디지털 워터마킹(watermarking) 과의 차이점

DRM은 디지털 컨텐츠의 저작권 침해를 근본적으로 차단하기 위한 저작권 관리 기술로 서 저작권 보호 기술을 기반으로 하는 워터마킹,DOI(Digital Object Identifier)및 INDECS(Intereoperability of Data in E-Commerce System)과 같은 저작권 추적기술에 비해 ,암호화 기술을 응용한 저작권관리기술은 저작권에 대한 대가를 지불한 사용자에게만 사용권을 줄 수 있는 보다 적극적인 저작권보호 기술입니다. 즉, 워터마킹 기술 자체가 '불법복제 및 유통된 컨텐츠를 누가 어디서 사용했는지를 추적할 수 있는 단서를 제공하는 것인 반면 DRM은 컨텐츠의 불법 사용 자체를 원천적으로 방지할 수 있는 것이 특징입니다.


***** 아름다운프로님에 의해서 게시물 복사 + 카테고리변경되었습니다 (2003-12-18 16:57)
Posted by 아름프로
Semantic Web의 표준화 및 요소기술 개발 동향


***** 아름다운프로님에 의해서 게시물 복사 + 카테고리변경되었습니다 (2003-12-18 16:52)
Posted by 아름프로

BLOG main image

카테고리

분류 전체보기 (539)
이야기방 (19)
토론/정보/사설 (16)
IBM Rational (9)
U-IT (0)
SOA/WS/ebXML (110)
개발방법론/모델링 (122)
J2SE (34)
J2EE (60)
DataBase (39)
Open Projects (30)
BP/표준화 (50)
Apache Projects (15)
Web/보안/OS (22)
Tools (7)
AJAX/WEB2.0 (1)
Linux/Unix (1)
영어 (0)
비공개방 (0)

최근에 올라온 글

최근에 달린 댓글

최근에 받은 트랙백

달력

«   2024/05   »
1 2 3 4
5 6 7 8 9 10 11
12 13 14 15 16 17 18
19 20 21 22 23 24 25
26 27 28 29 30 31

글 보관함

Total :
Today : Yesterday :